Initial plan
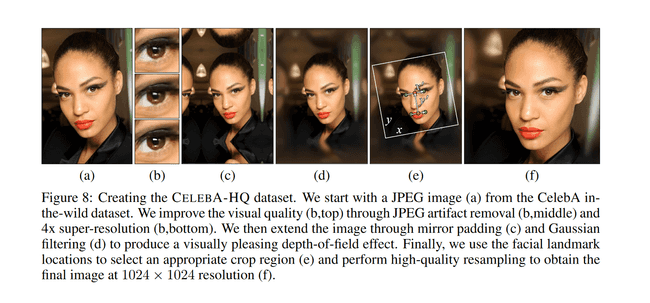
- read about crop blur technique in modern datasets. (I think I’ve seen it when I read about Celeb HQ)
- crop to faces: recognize faces, center, add padding if needed, blur/mirror background if needed
- train a diffusion model on them (what model to use, what library to use, what video card to use (nvidia/AMD)???)
Image files into dataset
Even when you have folders with JPG on PNG images, you still need to convert them into two-dimensional arrays across 3 color channels (red, green, and blue) that will be ready for models and easy to deploy or share.
So, first we start with some utilities like making a list of files
import pathlib

def get_all_items(root: pathlib.Path):
    for item in root.iterdir():
        if item.is_file():
            ext = item.suffix.lower()
            if ext in ['.png', '.jpg']:
                yield str(item)
        if item.is_dir():
            yield from get_all_items(item)

file_list_name = "dataset_file_list.txt"
with open(file_list_name, "w", encoding='utf-8') as output:
    for filename in get_all_items(pathlib.Path("dataset")):
        output.write(f'{filename}\n')
This list will help us when we use the datasets library
from datasets import load_dataset

dataset = load_dataset("text", data_files=file_list_name, split='train')
Files that I collected were of different size and aspect ratios. Neural networks (or diffusion models in particular) need small square pictures for the input. This is how we transform our dataset to 64x64
from PIL import Image
from torchvision import transforms

image_size = 64

preprocess = transforms.Compose(
    [
        transforms.Resize(image_size, interpolation=transforms.InterpolationMode.BILINEAR),
        transforms.RandomCrop(image_size),
        transforms.ToTensor(),  # Convert to tensor (0, 1)
        transforms.Normalize([0.5], [0.5]),  # Map to (-1, 1)
    ]
)

def transform(examples):
    images = [Image.open(e) for e in examples["text"]]
    proc_images = [preprocess(image.convert("RGB")) for image in images]
    return {"images": proc_images}

dataset_resized = dataset.map(transform, batched=True)
It's time to save the results. We will use parquet - a binary, more compact format.
# https://huggingface.co/docs/datasets/v2.14.0/en/process#save
# dataset_resized.save_to_disk("dataset/dataset-resized-64")

dataset_resized.to_parquet("dataset-resized-64.parquet")
Using dataset examples
Load and show images
import numpy as np
import torchvision
from datasets import load_dataset
from PIL import Image

dataset = load_dataset("parquet", data_files='dataset-resized-64.parquet', split="train")
dataset.set_format("torch")

def show_images(x):
    """Given a batch of images x, make a grid and convert to PIL"""
    x = x * 0.5 + 0.5  # Map from (-1, 1) back to (0, 1)
    grid = torchvision.utils.make_grid(x)
    grid_im = grid.detach().cpu().permute(1, 2, 0).clip(0, 1) * 255
    grid_im = Image.fromarray(np.array(grid_im).astype(np.uint8))
    return grid_im


def make_grid(images, size=64):
    """Given a list of PIL images, stack them together into a line for easy viewing"""
    output_im = Image.new("RGB", (size * len(images), size))
    for i, im in enumerate(images):
        output_im.paste(im.resize((size, size)), (i * size, 0))
    return output_im

batch_size = 16
dataset_resized.set_format("torch")
# Create a dataloader from the dataset to serve up the transformed images in batches
train_dataloader = torch.utils.data.DataLoader(
    dataset_resized, batch_size=batch_size, shuffle=True
)

device = torch.device("cuda" if torch.cuda.is_available() else "cpu")
xb = next(iter(train_dataloader))["images"].to(device)[:8]
print("X shape:", xb.shape)
show_images(xb) #.resize((8 * 64, 64), resample=Image.NEAREST)
Recognize faces
Just to avoid manual work. Also how to create unsupervised butt recognition model? Try to use GAN for object detection
Diffusion
conda create -n diffusers python=3.10
conda activate diffusers
pip install matplotlib Pillow datasets diffusers
pip3 install torch torchvision torchaudio --index-url https://download.pytorch.org/whl/cu118
pip install notebook
jupyter notebook
Diffusion in Python is slow. Because, well, who would have thought, it does a big portion in Python, not CUDA. Despite Python version is already spicy for my NVIDIA GeForce GTX 1060 (Compute Capability 6.1), I think that moving everything to C++ is a correct way. PyTorch C++ API
One main thing, gaussian noise, is what disappointed me in diffusion models. It just a funny toy that surprisingly works. It has no value for neural network research. Restoring/generating images from gray noise? That is not a sign on intellect. It's just an algorithm. And noise is not that important for that idea to work. One can use masks which will be much faster because noise generation is not fast with software implmentation.
It's worth noting that PyTorch 2.0 did some improvements for attention layers
I have some doubts that my model architecture is correct, because even after 560k steps (40 epochs on 14k training pictures) it looks almost like noise.
from diffusers import UNet2DModel

model = UNet2DModel(
    sample_size=image_size,  # the target image resolution
    in_channels=3,  # the number of input channels, 3 for RGB images
    out_channels=3,  # the number of output channels
    layers_per_block=2,  # how many ResNet layers to use per UNet block
    block_out_channels=(64, 128, 128, 256, 256),  # More channels -> more parameters
    down_block_types=(
        "DownBlock2D",  # a regular ResNet downsampling block
        "DownBlock2D",
        "DownBlock2D",
        "AttnDownBlock2D",  # a ResNet downsampling block with spatial self-attention
        "DownBlock2D",
    ),
    up_block_types=(
        "UpBlock2D",
        "AttnUpBlock2D",  # a ResNet upsampling block with spatial self-attention
        "UpBlock2D",
        "UpBlock2D",
        "UpBlock2D",  # a regular ResNet upsampling block
    ),
)